Welcome to All !! Visual Basic Tutorial, a place where you are going to learn Visual Basic ( also known as VB6 ). Visual Basic is very simple and interactive type of programming language, yet, is a great tool to develop programs. For newbees to the programing world, learning Visual Basic will be great start up. Happy Programming !!


How To Use :
Contact Me


  1. Create a Command Button and place it in the middle of the form.
  2. Change the Command Button Name Property from Command1 to cmdMsg.
  3. Change the Command Button Caption Property from Command1 to Display Message.
  4. Double-click on the Command Button and type this line of code :


Msgbox "Hello World", vbinformation


Back To Content


  1. Create 2 TextBox and place it in the middle of the form.
  2. Change the first TextBox Name Property to txtinput and the another one as txtoutput.
  3. Next, clear the both TextBox Text Property.
  4. Create 2 Label.
  5. Change one of the Label Name Property to lblinput and Label Caption Property to Input.
  6. Place it before TextBox ( txtinput ).
  7. Change the other one Label Name Property to lbloutput and Label Caption Property to Output.
  8. Place it before Textbox ( txtoutput ).
  9. Create 2 Command Button and place it below of the TextBox.
  10. Change one of the Command Button Name Property to cmddisplay
  11. Change the another Command Button Name Property to cmdclear.
  12. Change the Command Button ( cmddisplay ) Caption Property to Display Message.
  13. Change the Command Button ( cmdclear ) Caption Property to Clear.
  14. Double-click the Command Button ( cmddisplay ) and type this line of code :
  15.  

    txtoutput.Text = txtinput.Text


  16. Double-click the Command Button ( cmdclear ) and type this line of code :


    txtinput.Text = Empty
    txtoutput.Text = Empty


Back To Content


  1. Create a Label and place it in the middle of the form.
  2. Change the Label Name Property to lblOutput and clear the Label Caption Property.
  3. Create a TextBox and place it below of the Label.
  4. Change the TextBox Name Property to txtinput and clear the TextBox Text Property.
  5. Create 2 Label.
  6. Change one of the Label Name Property to lbloutput and Label Caption Property to Output.
  7. Place it before Label ( lblOutput ).
  8. Change the other one Label Name Property to lblinput and Label Caption Property to Input.
  9. Place it before Textbox ( txtinput ).
  10. Create 2 Command Button and place it below of the TextBox.
  11. Change one of the Command Button Name Property to cmddisplay
  12. Change the another Command Button Name Property to cmdclear.
  13. Change the Command Button ( cmddisplay ) Caption Property to Display Message.
  14. Change the Command Button ( cmdclear ) Caption Property to Clear.
  15. Double-click the Command Button ( cmddisplay ) and type this line of code :
  16.  

    lblOutput.Caption = txtInput.Text


  17. Double-click the Command Button ( cmdclear ) and type this line of code :


    txtInput.Text = Empty
    lblOutput.Caption = Empty


Back To Content


  1. Create 3 CheckBox and place it in the middle of the form.
  2. Change each of the CheckBox Name Property to chkBold, chkItalic, chkUnderline.
  3. Change the CheckBox ( chkbold ) Caption Property to Bold
  4. Change the CheckBox ( chkitalic ) Caption Property to Italic.
  5. Change the CheckBox ( chkunderline ) Caption Property to Underline.
  6. Create a TextBox and place it below of the 3 CheckBox.
  7. Change the TextBox Name Property to txtoutput and clear the TextBox Text Property.
  8. Create 2 Label.
  9. Change one of the Label Name Property to lblformat and Label Caption Property to Format.
  10. Place it before CheckBox.
  11. Change the other one Label Name Property to lbloutput and Label Caption Property to Output.
  12. Place it before Textbox ( txtoutput ).
  13. Create 2 Command Button and place it below of the TextBox.
  14. Change one of the Command Button Name Property to cmddisplay
  15. Change the another Command Button Name Property to cmdclear.
  16. Change the Command Button ( cmddisplay ) Caption Property to Display Message.
  17. Change the Command Button ( cmdclear ) Caption Property to Clear.
  18. Double-click the Command Button ( cmddisplay ) and type this line of code :
  19.  

    If chkbold.Value = 1 Then


    txtOutput.FontBold = True


    Else


    txtOutput.FontBold = False


    End If


    If chkitalic.Value = 1 Then


    txtOutput.FontItalic = True


    Else


    txtOutput.FontItalic = False


    End If


    If chkunderline.Value = 1 Then


    txtOutput.FontUnderline = True


    Else


    txtOutput.FontUnderline = False


    End If


  20. Double-click the Command Button ( cmdclear ) and type this line of code :


    chkbold.Value = 0
    chkitalic.Value = 0
    chkunderline.Value = 0
    txtOutput.Text = Empty


Back To Content


  1. Create 2 OptionButton and place it in the middle of the form.
  2. Change each of the OptionButton Name Property to opttimes and optarial.
  3. Change the OptionButton ( opttimes ) Caption Property to Times New Roman
  4. Change the OptionButton ( optarial ) Caption Property to Arial.
  5. Create a TextBox and place it below of the 2 OptionButton.
  6. Change the TextBox Name Property to txtoutput and clear the TextBox Text Property.
  7. Create 2 Label.
  8. Change one of the Label Name Property to lblfont and Label Caption Property to Font.
  9. Place it before OptionButton.
  10. Change the other one Label Name Property to lbloutput and Label Caption Property to Output.
  11. Place it before Textbox ( txtoutput ).
  12. Create a Command Button and place it below of the TextBox.
  13. Change the another Command Button Name Property to cmdclear.
  14. Change the Command Button ( cmdclear ) Caption Property to Clear.
  15. Double-click the OptionButton ( opttimes ) and type this line of code :
  16.  

    txtOutput.Font = "Times New Roman"


  17. Double-click the OptionButton ( optarial ) and type this line of code :
  18.  

    txtOutput.Font = "Arial"


  19. Double-click the Command Button ( cmdclear ) and type this line of code :


    opttimes.Value = 0
    optarial.Value = 0
    txtOutput.Text = Empty


Back To Content


  1. Create a ComboBox and place it in the middle of the form.
  2. Change the ComboBox Name Property to cmbitem.
  3. Change the ComboBox Text Property to Select Item.
  4. Create a TextBox and place it top of the ComboBox ( cmbitem ).
  5. Change the TextBox Name Property to txtinput and clear the TextBox Text Property.
  6. Create 2 Label.
  7. Change one of the Label Name Property to lblinput and Label Caption Property to Input.
  8. Place it before Textbox ( txtinput ).
  9. Change the other one Label Name Property to lblitem and Label Caption Property to Item.
  10. Place it before ComboBox ( cmbitem ).
  11. Create 2 Command Button.
  12. Change each of the Command Button Name Property to cmdadd, cmdremv.
  13. Place the Command Button ( cmdadd ) below of the TextBox.
  14. Place the Command Button ( cmdremv ) below of the ComboBox.
  15. Double-click the Command Button ( cmdadd ) and type this line of code :
  16.  

    cmbItem.AddItem (txtInput.Text)
    MsgBox "Item Added Into ComboBox : " & txtInput.Text, vbInformation

    txtInput.Text = Empty


  17. Double-click the Command Button ( cmdremv ) and type this line of code :


    If cmbItem.ListIndex = -1 Then


    MsgBox "Please Select Item To Remove", vbInformation


    Else


    cmbItem.RemoveItem (cmbItem.ListIndex)
    cmbItem.Text = "Select Item"


    End If


Back To Content


  1. Create a ListBox and place it in the middle of the form.
  2. Change the ListBox Name Property to lstitem.
  3. Create a TextBox and place it top of the ListBox.
  4. Change the TextBox Name Property to txtinput and clear the TextBox Text Property.
  5. Create 2 Label.
  6. Change one of the Label Name Property to lblinput and Label Caption Property to Input.
  7. Place it before Textbox ( txtinput ).
  8. Change the other one Label Name Property to lblitem and Label Caption Property to Item.
  9. Place it before ComboBox ( lstitem ).
  10. Create 2 Command Button.
  11. Change each of the Command Button Name Property to cmdadd, cmdremv.
  12. Place the Command Button ( cmdadd ) below of the TextBox.
  13. Place the Command Button ( cmdremv ) below of the ListBox.
  14. Double-click the Command Button ( cmdadd ) and type this line of code :
  15.  

    lstItem.AddItem (txtInput.Text)
    MsgBox "Item Added Into ComboBox : " & txtInput.Text, vbInformation
    txtInput.Text = Empty


  16. Double-click the Command Button ( cmdremv ) and type this line of code :


    If lstItem.ListIndex = -1 Then


    MsgBox "Please Select Item To Remove", vbInformation


    Else


    lstItem.RemoveItem (lstItem.ListIndex)


    End If


Back To Content


  1. Create 2 Frame and place it in the middle of the from.
  2. Change the Frame Name Properties to frmCheck and frmOption.
  3. Change the Frame Caption ( frmOption ) to Font.
  4. Create 2 OptionButton inside frmOption.
  5. Change each of the OptionButton Name Property to opttimes and optarial.
  6. Change the OptionButton ( opttimes ) Caption Property to Times New Roman
  7. Change the OptionButton ( optarial ) Caption Property to Arial.
  8. Change the Frame Caption ( frmCheck ) to Format.
  9. Create 3 CheckBox inside frmCheck.
  10. Change each of the CheckBox Name Property to chkBold, chkItalic, chkUnderline.
  11. Change the CheckBox ( chkbold ) Caption Property to Bold
  12. Change the CheckBox ( chkitalic ) Caption Property to Italic.
  13. Change the CheckBox ( chkunderline ) Caption Property to Underline.
  14. Change the TextBox Name Property to txtoutput and clear the TextBox Text Property.
  15. Create a Label and place it before Textbox ( txtoutput ).
  16. Change one of the Label Name Property to lblOutput and Label Caption Property to Output.
  17. Create 2 Command Button and place it below of the TextBox.
  18. Change one of the Command Button Name Property to cmddisplay
  19. Change the another Command Button Name Property to cmdclear.
  20. Change the Command Button ( cmddisplay ) Caption Property to Display Message.
  21. Change the Command Button ( cmdclear ) Caption Property to Clear.
  22. Double-click the OptionButton ( opttimes ) and type this line of code :
  23.  

    txtOutput.Font = "Times New Roman"


  24. Double-click the OptionButton ( optarial ) and type this line of code :
  25.  

    txtOutput.Font = "Arial"


  26. Double-click the Command Button ( cmddisplay ) and type this line of code :
  27.  

    If chkbold.Value = 1 Then


    txtOutput.FontBold = True


    Else


    txtOutput.FontBold = False


    End If


    If chkitalic.Value = 1 Then


    txtOutput.FontItalic = True


    Else


    txtOutput.FontItalic = False


    End If


    If chkunderline.Value = 1 Then


    txtOutput.FontUnderline = True


    Else


    txtOutput.FontUnderline = False


    End If


  28. Double-click the Command Button ( cmdclear ) and type this line of code :


    optTimes.Value = 0
    optarial.Value = 0
    chkBold.Value = 0
    chkItalic.Value = 0
    chkUnderline.Value = 0
    txtOutput.Text = Empty


Back To Content


  1. Create 2 Image and place it in the middle of Form.
  2. Change the Image Name Property to imgTrue and imgFalse.
  3. Go to Image ( imgFalse ) Picture Property and click the Button in the Picture Property to select your image.
  4. Go to Image ( imgTrue ) Picture Property and click the Button in the Picture Property to select the same image.
  5. Change the Image ( imgTrue ) Strecth Property to True and resize the Image according to your preference.
  6. Create 2 Label.
  7. Change one of the Label Name Property to lblFalse and Label Caption Property to Strecth = False.
  8. Place it top of the Image ( imgFalse ).
  9. Change the other one Label Name Property to lblTrue and Label Caption Property to Strecth = True.
  10. Place it top of the Image ( imgTrue ).

Back To Content


  1. Create 6 Shape and place in the middle of the Form.
  2. Change the Shape Name Property to shpRectangle, shpSquare, shpOval, shpCircle, shpRRectangle , shpRSquare.
  3. By default, Square Shape will generated when you create a Shape.
  4. Change the Shape Shape Property to 0 - Rectangle.
  5. Change the Shape Shape Property to 1 - Square.
  6. Change the Shape Shape Property to 2 - Oval.
  7. Change the Shape Shape Property to 3 - Circle.
  8. Change the Shape Shape Property to 4 - Rounded Rectangle.
  9. Change the Shape Shape Property to 5 - Rounded Square.
  10. Change the Shape Fill Style to 0 - Solid and change the Shape Fill Color according to your preference for all the Shape.
  11. Change the Shape Border Style to 0 - Solid and change the Shape Border Color according to your preference for all the Shape.
  12. Create 6 Label.
  13. Change the Label Name Property to lblRectangle, lblSquare, lblOval, lblCircle, lblRRectangle , lblRSquare.
  14. Change the Label ( lblRectangle ) Caption Property to Rectangle and place it above the Rectangle Shape.
  15. Change the Label ( lblSquare ) Caption Property to Square and place it above the Square Shape.
  16. Change the Label ( lblOval ) Caption Property to Oval and place it above the Oval Shape.
  17. Change the Label ( lblCircle ) Caption Property to Circle and place it above the Circle Shape.
  18. Change the Label ( lblRRectangle ) Caption Property to Rounded Rectangle and place it above the Rounded Rectangle Shape.
  19. Change the Label ( lblRSquare ) Caption Property to Rounded Square and place it above the Rounded Square Shape.

Back To Content


  1. Create a Timer and place it at the top-left corner of the Form.
  2. Change the Timer Name Property to tmrMove.
  3. Change the Timer Interval Property to 500.
  4. Create a Shape and place it in the middle of Form.
  5. Change the Name Property to shpMove.
  6. Change the Shape Shape Property to to 3 - Circle.
  7. Change the Fill Style to 0 - Solid and change the Fill Color according to your preference.
  8. Change the Shape Left Property to 120.
  9. Double-click the Timer ( tmrMove ) and type this line of code :
  10. shpMove.Left = shpMove.Left + 25

  11. Change the Timer ( tmrMove ) to 1000 and then 100 to see different results. Timer can be use for various reason, from Splash Screen up to a simple animation.

Back To Content


  1. Create a DriveListbox and place it in the middle of the Form.
  2. Change the DriveListbox Name Property to drvMyImage.
  3. Create a DirListBox and place it in the middle of the Form below the DriveListbox.
  4. Change the DirListBox Name Property to dirMyImage.
  5. Create a FileListBox and place it in the middle of the Form and next to the DirListBox.
  6. Change the FileListBox Name Property to fileMyImage.
  7. Change FileListBox ( fileMyImage ) Pattern Property to *.jpg.
  8. Create a Image and place it next to the DriveListbox, DirListBox and FileListBox.
  9. Change the Image Name Property to imgMyImage.
  10. Double-click the DriveListbox ( drvMyImage ) and type this line of code :
  11.  

    dirMyImage.Path = drvMyImage.Drive


  12. Double-click the DirListBox ( dirMyImage ) and type this line of code :
  13.  

    fileMyImage.Path = dirMyImage.Path


  14. Double-click the DirListBox ( fileMyImage ) and type this line of code :


imgMyImage.Picture = LoadPicture(fileMyImage.Path + "\" + fileMyImage.FileName)

imgMyImage.Height = 2535
imgMyImage.Width = 2175


Back To Content


  1. Go to Project, select Component or press Ctrl+T.
  2. Select Microsoft Windows Common Controls 6.0 (SP6) and click OK ( Notice that there is new component loaded into your toolbox ).
  3. Create a ImageList and place it in the middle of the Form.
  4. Change the ImageList Name Property to imgMyList.
  5. Select ImageList, right-click and go to Properties.
  6. Select General Tab and select 16 X 16 ( The Best View Size ).
  7. Select Images Tab and press Insert Picture.

  1. The Select Picture Dialog Box appears and select the folder where your icons located, if you don’t have any icon, download here : ICON.zip.
  2. Select the icon you want to use OR simply press ctrl+A to select all and press Open and it will load the entire icon into the Images tray.
  3. Notice that, when you select any of the icon in the tray's the Index change as well.
  4. The usage of the Index is a key to apply and display the icon on the ToolBar, TreeView and ListView.
Note : You Can Use The Same ImageList For More Then One Control At The Same Time


Back To Content


Remider : You Must Create ImageList Before Following Below Steps.
  1. Go to Project, select Component or press Ctrl+T.
  2. Select Microsoft Tabbed Dialog Control 6.0 and click OK ( Notice that there is new component loaded into your toolbox ).
  3. Create a TreeView and place it in the middle of the Form.
  4. Change the TreeView Name Property to tvwHelp.
  5. Right-Click on the TreeView ( tvwHelp ) and select Properties.
  6. Change LineStyle Property to 1-tvwRootLines and change LabelEdit Property to 1-tvwManual, press Apply.
  7. Change ImageList Property to < Your ImageList Name >.
  8. Create a Label and change Name Property to lblContext.
  9. Clear the Label ( lblContext ) Caption Property and place it next to the TreeView ( tvwHelp ).
  10. Create 2 Label and change Name Property to lblHelp and lblCtxt.
  11. Change the Label ( lblHelp ) Caption Property to Help and place it above TreeView ( tvwHelp ).
  12. Change the Label ( lblCtxt ) Caption Property to Context and place it above Label ( lblContext ).
  13. Double-Click on your Form and type this code :
  14.  

    'First Node

    'Parent

    'The IND1 is the key to access the Node, the Name of the Node, the ImgeList Icon Index
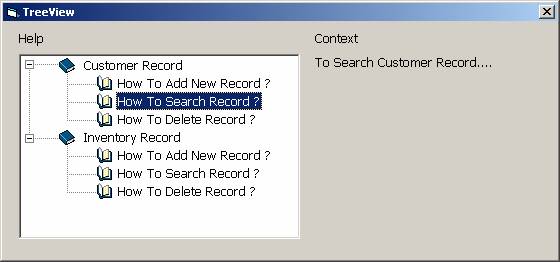
    tvwHelp.Nodes.Add , , "IND1", " Customer Record ", 1

    'Child
    tvwHelp.Nodes.Add "IND1", tvwChild, "IND1.2", "How To Add New Record ?", 2
    tvwHelp.Nodes.Add "IND1", tvwChild, "IND1.3", "How To Search Record ?", 2
    tvwHelp.Nodes.Add "IND1", tvwChild, "IND1.4", "How To Delete Record ?", 2


    'Second Node

    'Parent

    'The IND2 is the key to access the Node, the Name of the Node, the ImgeList Icon Index
    tvwHelp.Nodes.Add , , "IND2", " Inventory Record ", 1

    'Child
    tvwHelp.Nodes.Add "IND2", tvwChild, "IND2.2", "How To Add New Record ?", 2
    tvwHelp.Nodes.Add "IND2", tvwChild, "IND2.3", "How To Search Record ?", 2
    tvwHelp.Nodes.Add "IND2", tvwChild, "IND2.4", "How To Delete Record ?", 2


  15. Double-Click on your TreeView, Select DblClick ( Double-Click ) Event and type this code :


    Select Case tvwHelp.SelectedItem.Key
    Case "IND1.2"
    lblContext.Caption = "To Add New Customer Record...."
    Case "IND1.3"
    lblContext.Caption = "To Search Customer Record...."
    Case "IND1.4"
    lblContext.Caption = "To Delete Customer Record...."
    Case "IND2.2"
    lblContext.Caption = "To Add New Inventory Record...."
    Case "IND2.3"
    lblContext.Caption = "To Search Inventory Record...."
    Case "IND2.4"
    lblContext.Caption = "To Delete Inventory Record...."
    Case Else
    lblContext.Caption = "Please Select A Topic"
    End Select


Back To Content


Remider : You Must Create ImageList Before Following Below Steps.
  1. Go to Project, select Component or press Ctrl+T.
  2. Select Microsoft Tabbed Dialog Control 6.0 and click OK ( Notice that there is new component loaded into your toolbox ).
  3. Create a ListView and place it in the middle of the Form.
  4. Change the ListView Name Property to lvwMenu.
  5. Right-Click on the ListView ( lvwMenu ) and select Properties.
  6. Select General Tab and un-tick the ListView LabelWrap Property.
  7. Change Arrange to 1 - lvwAutoLeft.
  8. Select Image Lists Tab and change ListView Normal, Small, Column Header Property to < Your ImageList Name >.
  9. Create a Label and change Name Property to lblContext.
  10. Clear the Label ( lblContext ) Caption Property and place it next to the ListView ( lvwMenu ).
  11. Create another Label and change Name Property to lblCtxt.
  12. Change the Label ( lblCtxt ) Caption Property to Context and place it above Label ( lblContext ).
  13. Double-Click on your Form and type this code :
  14.  

    lvwMenu.ListItems.Clear
    Dim lstitem As ListItem

    '1 is the Index, "DMX" is the key to use the Image, the name for Image, the ImageList Icon index
    Set lstitem = lvwMenu.ListItems.Add(1, "DMX", "Dreamweaver MX", 2)
    Set lstitem = lvwMenu.ListItems.Add(2, "EXM", "Extension Manager", 3)
    Set lstitem = lvwMenu.ListItems.Add(3, "FMX", "Flash MX", 4)
    Set lstitem = lvwMenu.ListItems.Add(4, "FPL", "Flash Player", 1)


  15. Double-Click on your ListView, Select DblClick ( Double-Click ) Event and type this code :


    Select Case lvwMenu.SelectedItem.Key
    Case "DMX"
    lblContext.Caption = "Dreamweaver MX...."
    Case "EXM"
    lblContext.Caption = "Extension Manager...."
    Case "FMX"
    lblContext.Caption = "Flash MX...."
    Case "FPL"
    lblContext.Caption = "Flash Player...."
    End Select


Back To Content


  1. Go to Project, select Component or press Ctrl+T.
  2. Select Microsoft Windows Common Controls-2 6.0 and click OK ( Notice that there is new component loaded into your toolbox ).
  3. Create 2 DTPicker and place it in the middle of the Form.
  4. Change one of the DTPicker Name Property to dtpDate.
  5. Change another one DTPicker Name Property to dtpTime.
  6. Change the DTPicker (dtpDate) Format Property to 1-dtpShortDate.
  7. Change the DTPicker (dtpTime) Format Property to 2-dtpTime.
  8. Change the DTPicker (dtpTime) Value Property to 00.00.
  9. Create 2 Label and change Name Property to lblDate and lblTime.
  10. Change the Label ( lblDate ) Caption Property to Date and place it before DTPicker (dtpDate) .
  11. Change the Label ( lblTime ) Caption Property to Time and place it before DTPicker (dtpTime).
  12. Create 2 Command Button and place it below of the DTPicker.
  13. Change the Command Button Name Property to cmdDisplay and cmdReset.
  14. Change the Command Button ( cmdDisplay ) Caption Property to Display Date And Time.
  15. Change the Command Button ( cmdReset ) Caption Property to Reset Date And Time.
  16. Double-click the Command Button ( cmdDisplay ) and type this line of code :
  17.  

    MsgBox "The Date You Selected Is : " & dtpDate.Value, vbInformation

    MsgBox "The Time You Selected Is : " & dtpTime.value, vbInformation


  18. Double-click the Command Button ( cmdReset ) and type this line of code :


    dtpDate.Value =Date

    dtpTime.value=Time


Back To Content


  1. Go to Project, select Component or press Ctrl+T.
  2. Select Microsoft ADO Data Control 6.0 (OLEDB) and click OK ( Notice that there is new component loaded into your toolbox ).
  3. Create a Adodc and place it in the middle of the Form.
  4. Change the Adodc Name Property to adoMyDatabase.
  5. Right-click on the Adodc select Properties, Property Pages Window will appear.
  6. In the Property Pages Window, click on Build.
  7. Data Link Window will appear and at the Provider Tab, select Microsoft Jet 4.0 OLE DB Provider, and click Next.
  8. At the Connection Tab, click on the button. Select Access Database Window will appear.
  9. Select Your Database ( Microsoft Access Database ), and finally click on Test Connection.
  10. Proceed if connection success else try different Database.
  11. Click Ok to exit the Data Link Window.
  12. At Property Pages Window, select RecordSource Tab, change Command Type to 2 – adCmdTable.
  13. In the Table or Stored Procedure Name, select the table you want to view the data.
  14. Click OK to exit the Property Pages Window.
  15. Change the Adodc Visible Property to False.
  16. Usually this control use as bridge between your program and database to retrieve data.
  17. It also oftenly use with other component, likewise Hierarchical FlexGrid.
    Note : You Can Use The Same Adodc For More Then One Control At The Same Time


Back To Content


Remider : You Must Create Adodc Before Following Below Steps.
  1. Go to Project, select Component or press Ctrl+T.
  2. Select Microsoft Hierarchical FlexGrid Control 6.0 (OLEDB) and click OK ( Notice that there is new component loaded into your toolbox ).
  3. Create a MSHFlexGrid and place it in the middle of the Form.
  4. Change the MSHFlexGrid Name Property to mshMyData.
  5. Right-click on the MSHFlexGrid and select Property.
  6. At the General tab, change Fixed Cols to 0 and click OK yo exit the Property Pages Window.
  7. Select MSHFlexGrid and go to DataSource Property.
  8. Select your Adodc from the list.
  9. Next, right-click on MSHFlexGrid and click on Retrieve Structure.
  10. Now it should retrieve the entire Field name from the Table you selected in the Adodc.
  11. If there is any Field shoudn't be displayed, all you have to do is right-click on the MSHFlexGrid and go to Properties.
  12. At the Bands Tab, just un-tick the Field you don’t want and click OK.
  13. Create a Label and place it above your MSHFlexGrid.
  14. Change the Label Name to lblGrid and change the Caption to My Data.

Back To Content


Remider : You Must Create ImageList Before Following Below Steps.
  1. Go to Project, select Component or press Ctrl+T.
  2. Select Microsoft Windows Common Controls 6.0 (SP6) and click OK ( Notice that there is new component loaded into your toolbox ).
  3. Create ToolBar on your Form, it will automatically place on the top of the Form.
  4. Change the ToolBar Name Property to tbrInfo.
  5. Select the ToolBar, right-click and go to the Properties, select the General Tab, at ImageList, select your ImageList.
  6. At the General Tab, change Appearance to 0 – ccFlat.
  7. At the General Tab, change Style to 1 – tbrFlat.
  8. At the Buttons Tab and press Insert Button twice to create 2 Button.
  9. To ensure that you have created 3 Button, check the Index by using the Navigation Button. Press Forward Sign Button until the value in the Index textbox is not changing anymore.
  10. That value is the total number of Button.
  11. Select the Buttons Tab and change the Caption, Key and Image as listed below :


    Index Caption Key Image

    1

    Date And Time

      < Image List Icon Index>

    2

    Exit

    EX < Image List Icon Index>

At the Buttons Tab, select Date And Time, change the Style Property to 5 - tbrDropdown.

At the ButtonMenus, press Insert ButtonMenu twice to create 2 menu button.

Change the following Property :

    Index

    Caption

    Key

    1

    Date

    DT

    2

    Time

    TM

Double-click the ToolBar ( tbrInfo ) and type this line of code :


Select Case Button.Key


Case "EX"
End
Exit Sub


End Select


Double-click the ToolBar ( tbrInfo ), change the Event to BuutonMenuClick and type this line of code :


Select Case ButtonMenu.Key


Case "DT"

MsgBox "Date : " & Date
Exit Sub


Case "TM"

MsgBox "Time : " & Time
Exit Sub


End Select


Back To Content


  1. Go to Project, select Component or press Ctrl+T.
  2. Select Microsoft Tabbed Dialog Control 6.0 and click OK ( Notice that there is new component loaded into your toolbox ).
  3. Create a SSTab and place it in the middle of the Form.
  4. Change the SSTab Name Property to stbInfo.
  5. Right-Click on the SSTab (stbInfo) and select Properties.
  6. Change Style Property to 1-ssStylePropertyPage, press Apply. Notice that you’re Tab design is changed.
  7. Next, make sure Current Tab is on 0, if not; use the Navigation Button to move to the 0. Notice that, when you change the Current Tab, the Tab will move accordingly.
  8. Change the SSTab Caption as listed below:

    Current Tab

    Tab Caption

    0

    Student Details

    1

    Class Schedule

    2

    Fee's Payment

  9. Create 3 Command Button and place it top of the SSTab (stbInfo).
  10. Change each of the Command Button Name Property to cmdstud, cmdclass and cmdfees.
  11. Change the Command Button ( cmdstud ) Caption Property to Student Details.
  12. Change the Command Button ( cmdclass ) Caption Property to Class Schedule.
  13. Change the Command Button ( cmdfees ) Caption Property to Fee's Payment.
  14. Double-click the Command Button ( Student Details ) and type this line of code :
  15.  

    stbInfo.Tab=0


  16. Double-click the Command Button ( Class Schedule ) and type this line of code :


    stbInfo.Tab=1


  1. Double-click the Command Button ( Fee's Payment ) and type this line of code :


    stbInfo.Tab=2


Back To Content


  1. Go to Project, select Component or press Ctrl+T.
  2. Select Microsoft Masked Edit Control 6.0 and click OK ( Notice that there is new component loaded into your toolbox ).
  3. Create a MaskEdBox and place it in the middle of the Form.
  4. Change the MaskEdBox Name Property to msdID.
  5. Next, for the validation part enter the MaskEdBox Mask Property ??####.
  6. ??#### is the mask for 2 character and 4 digits. The mask is to ensure user enter 2 character and 4 digits.
  7. Create a TextBox and place it below the MaskEdBox ( msdID ).
  8. Change the TextBox Caption Property to txtID and clear the Text Property.
  9. Create 2 Command Button and place it below of the TextBox.
  10. Change the first Command Button Name Property to cmddisplay and the another one as cmdclear.
  11. Change each of the Command Button ( cmddisplay ) Caption Property to Display Message.
  12. Change each of the Command Button ( cmdclear ) Caption Property to Clear.
  13. Double-click the Command Button ( cmddisplay ) and type this line of code :
  14.  

    MsgBox "MaskEdBox : " & msdID.Text & vbCrLf & "TextBox : " & txtID.Text


  15. Double-click the Command Button ( cmdclear ) and type this line of code :


msdID.Mask = Empty
msdID.Text = Empty
msdID.Mask = "??####"
txtID = Empty


Back To Content